Post by Rebsie on Nov 7, 2008 11:28:13 GMT -5
Michel asked me a while back for some information on hybridising peas. So here it is, a little tutorial to get you started. For a more detailed explanation there's two more articles about it on my blog:
daughterofthesoil.blogspot.com/2006/06/how-to-hybridise-garden-peas.html
daughterofthesoil.blogspot.com/2007/05/how-to-breed-your-own-garden-peas.html
... and a lot more in Carol Deppe's book.
I promise crossing peas is a lot less effort to do than it is to read about. And it gets easier with practice.
<><><><><><><><><><><><><><><><><><><><><><><><><><><><><><><>
Peas are inbreeding and generally don't have problems with inbreeding depression. The flowers are sealed up and perfectly self-fertile.
The only tool I use for hand-pollinating is an artist's scalpel. If something else works better for you, that's fine.
The first step is to find a flower at the right stage. With peas that means using young buds, because self-pollination happens very early on. The optimum stage varies with different varieties and weather conditions, so you may have to do the first few by trial and error. They tend to shed pollen quicker in warm weather, so you can sometimes get away with using older buds on cool overcast days. The bigger the bud the easier it is to work with.
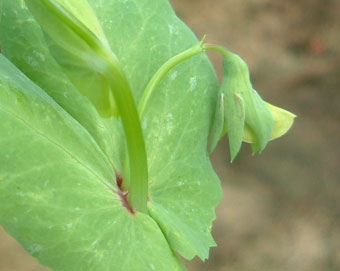
But as a general rule, choose buds where the petals are just about visible as they start to protrude from the sepals. The photo below shows a promising-looking bud, about as late as you can get away with it.

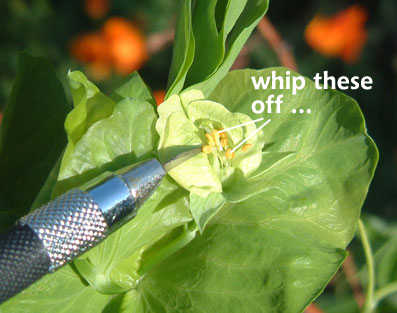
Step 1: Peel open the bud ... gently roll back the sepals and the two outer layers of petals, and hold them back out of the way. Inside is the keel petal, which is a sealed bag with a crinkly seam down the middle. You'll need to slice this petal open to get to the vital bits. Some people remove it altogether, which does no harm, but I find it useful to leave it on so I can wrap the pollinated bud back up afterwards. (Keeps it clean and stops it drying out.)
Step 2: As soon as you cut the keel open you can see how close the bud is to self-pollinating. There are 10 stamens (aka. little stalks with yellow blobby bits) and they gradually grow up towards the tip of the keel petal where they splurge pollen all over the stigma. Fortunately they tend not to shed any pollen until they reach the tip, and the stigma becomes receptive a couple of days before that, so you have a good window of opportunity to hand-pollinate.
What you're looking for: the anthers should be smooth, dark yellow blobs with no traces of yellow powder on them, and should not yet have reached the tip. If the anthers look fluffy or there is pollen inside the keel, it's too late.
Being careful not to damage the style (aka. the long green bendy bit in the middle) pull out all the anthers through the slit and pop them off with the scalpel blade.

Step 3: Mark the bud before you forget which one it was! I usually tie a scrap of coloured thread around its stalk ... not too tight.
Step 4: Find a good pollen source on your 'father' plant. Again it varies with the weather, but the best bet is a large bud which is almost ready to open. Make a small slice in the tip of the keel petal and scoop out a dollop of pollen onto the blade. Most varieties produce pollen in abundance. Fresh, fertile pea pollen is a deep rich yellow colour. If it's turned a pale sandy colour it's too old.
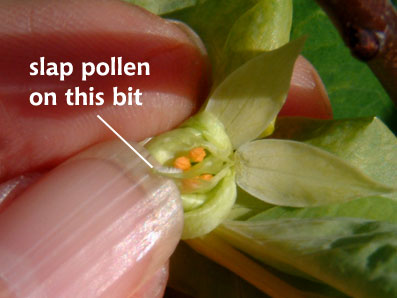
Step 5: Gently dab the pollen onto the stigma of the 'mother' flower. Just to be clear, the stigma is at the very tip of the style. It's NOT the bristly brushy bit just below the tip ... that part is not receptive.

Although you have to be reasonably gentle, pea styles are a lot more robust than tomatoes! They bend instead of snapping off, so they are quite forgiving.
Once you have some pollen in place, you can tuck the style back into its little petal bag and let it get on with it.
There are generally no problems with the stigma drying out. No problems with unwanted cross-pollination either, because the flowers don't really attract pollinators. Occasionally you may get a smaller number of peas in a hand-pollinated pod, but you can increase the success rate if you want by pollinating the same flower twice on consecutive days.
The flower will open as normal over the next few days. Allow the pods to develop fully ... it's safe to harvest them as soon as they start to look a bit sunken at the top of the pod. I usually bring mine indoors to finish drying, but you can leave them to dry on the plant if you have a good climate.
daughterofthesoil.blogspot.com/2006/06/how-to-hybridise-garden-peas.html
daughterofthesoil.blogspot.com/2007/05/how-to-breed-your-own-garden-peas.html
... and a lot more in Carol Deppe's book.
I promise crossing peas is a lot less effort to do than it is to read about. And it gets easier with practice.
<><><><><><><><><><><><><><><><><><><><><><><><><><><><><><><>
Peas are inbreeding and generally don't have problems with inbreeding depression. The flowers are sealed up and perfectly self-fertile.
The only tool I use for hand-pollinating is an artist's scalpel. If something else works better for you, that's fine.
The first step is to find a flower at the right stage. With peas that means using young buds, because self-pollination happens very early on. The optimum stage varies with different varieties and weather conditions, so you may have to do the first few by trial and error. They tend to shed pollen quicker in warm weather, so you can sometimes get away with using older buds on cool overcast days. The bigger the bud the easier it is to work with.
But as a general rule, choose buds where the petals are just about visible as they start to protrude from the sepals. The photo below shows a promising-looking bud, about as late as you can get away with it.

Step 1: Peel open the bud ... gently roll back the sepals and the two outer layers of petals, and hold them back out of the way. Inside is the keel petal, which is a sealed bag with a crinkly seam down the middle. You'll need to slice this petal open to get to the vital bits. Some people remove it altogether, which does no harm, but I find it useful to leave it on so I can wrap the pollinated bud back up afterwards. (Keeps it clean and stops it drying out.)
Step 2: As soon as you cut the keel open you can see how close the bud is to self-pollinating. There are 10 stamens (aka. little stalks with yellow blobby bits) and they gradually grow up towards the tip of the keel petal where they splurge pollen all over the stigma. Fortunately they tend not to shed any pollen until they reach the tip, and the stigma becomes receptive a couple of days before that, so you have a good window of opportunity to hand-pollinate.
What you're looking for: the anthers should be smooth, dark yellow blobs with no traces of yellow powder on them, and should not yet have reached the tip. If the anthers look fluffy or there is pollen inside the keel, it's too late.
Being careful not to damage the style (aka. the long green bendy bit in the middle) pull out all the anthers through the slit and pop them off with the scalpel blade.

Step 3: Mark the bud before you forget which one it was! I usually tie a scrap of coloured thread around its stalk ... not too tight.
Step 4: Find a good pollen source on your 'father' plant. Again it varies with the weather, but the best bet is a large bud which is almost ready to open. Make a small slice in the tip of the keel petal and scoop out a dollop of pollen onto the blade. Most varieties produce pollen in abundance. Fresh, fertile pea pollen is a deep rich yellow colour. If it's turned a pale sandy colour it's too old.
Step 5: Gently dab the pollen onto the stigma of the 'mother' flower. Just to be clear, the stigma is at the very tip of the style. It's NOT the bristly brushy bit just below the tip ... that part is not receptive.

Although you have to be reasonably gentle, pea styles are a lot more robust than tomatoes! They bend instead of snapping off, so they are quite forgiving.
Once you have some pollen in place, you can tuck the style back into its little petal bag and let it get on with it.
There are generally no problems with the stigma drying out. No problems with unwanted cross-pollination either, because the flowers don't really attract pollinators. Occasionally you may get a smaller number of peas in a hand-pollinated pod, but you can increase the success rate if you want by pollinating the same flower twice on consecutive days.
The flower will open as normal over the next few days. Allow the pods to develop fully ... it's safe to harvest them as soon as they start to look a bit sunken at the top of the pod. I usually bring mine indoors to finish drying, but you can leave them to dry on the plant if you have a good climate.


